Step 5: Security Setup and Final Install
Now that the WRE54G is successfully connected, we can restore wireless security and take a few other security precautions.
A) Restore your AP's security settings. If you turned them off earlier, restore the settings you had. If you did not have security enabled (like to live dangerously, eh?) then this is a good time to enable it.
Find the Wireless Security section of your AP and see what options it provides. Older equipment will probably show only WEP encryption, but newer products should allow selection of WEP or WPA-PSK (Pre-Shared Key). Use WPA-PSK if at all possible, but you'll have to use WEP if only one of your wireless clients can't support WPA-PSK.
While you're at it, if you haven't changed your SSID from the default of "linksys", now would be a good time. The main reason to do this is that it might help keep your wireless clients (and the WRE54G) connected to your WLAN instead of your neighbor's. Pick an SSID that's not obvious and that also doesn't announce to the world where your WLAN is located.
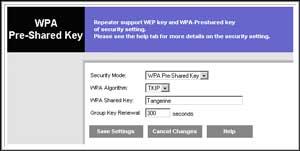
B) After you've set up / restored your WLAN's security and tested it, you can set it up on the WRE54G. Log back into the WRE54G and click on the Edit Security Settingsbutton in the lower middle of the screen. You should then see the screen in Figure 2.

![]()
Figure 2: WRE54G Edit Security screen
Just change the WRE54G's security settings to match those on your AP. Everything must be exactly the same. The Group Key Renewal setting, however, can be left at the default.
Save the settings and close the window and you should now be again looking at the main Setup screen. While you're there, change the SSID to match your AP's, if you changed it.
C) Change the WRE54G password. Anyone who knows the Linksys default password (and who doesn't?) will be able to access your WRE54G's controls andchange the settings. Worse, since the shared key is the same on the WRE54G andthe AP, they will also have access to your wireless network (assuming they logged into the WRE54G from a wired connection). So, the WRE54G can be areally large security hole.
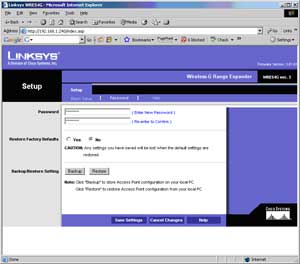
To change the WRE54G’s access password click the Password link on the main Setup screen to bring up the screen shown in Figure 3.

![]()
Figure 3: WRE54G Password screen
Enter a new strong password, write it down, save the settings and power cycle the WRE54G to get all of your changes into effect. Makesure you put the password someplace where you can find it.Otherwise, the only solution will be to reset the WRE54G's settings to theirdefaults and redo the whole setup.
TIP: Just Google strong password generator to find one of many tools that will create a nice, new, secure password for you.
D) Move the WRE54G to its location. Now that your have a working and secured WRE54G, you can move it so that it starts doing what you purchased it for. That WRE54G's location needs to be someplace where there is still a good signal fromthe target AP.
If you locate the WRE54G in an area with poor signal reception, wireless throughput will suffer since speed will be limited by the WRE54G's connection back to your main AP. So choose a location somewhere between thetargeted AP and the computer(s) that needs to connect.
Also keep in mind that the actual throughput you get through the WRE54G will be less than half what you would get from a direct AP connection, even if your computer is right next to the WRE54G. That's because the repeating action performed by the WRE54G involves a single radio that has to both receive and retransmit. Still, a slower signal is better than none at all, as long as what you're doing with the connection doesn't depend on speed.
Once you've chosen a location, move the WRE54G to and power it up. In a minute or twoyou should get two blue lights. Now watch the lights for a few minutes. If you see thetop light changing between red and blue, the WRE54G is probably too farfrom the AP. You may have to experiment to get a location that's a good compromise between speed and range.
can i use the linksys expander WRE54G with a mikrotic router that has atheros wireless card as it wireless
Thanks, had some issues with a dark blue light next to link, played around with it …..
Soln-
(switch of the WRE54G, keep reset pressed for 30 seconds, switch on the power, keep it held for 30 seconds..power cycle it, and kaboom its back from the dead)
….and followed your instructions…up and running..
Consider to put the same security configuration in both (AP & WRE54G), the same type and key.