Setup and Administration
Once you get it out of the box, you'll find that both the Quick Installation and User Guides direct you to run the Setup Wizard on the supplied CD. For that, though, you'll need a system running Windows.
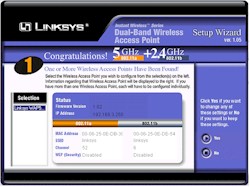
Figure 2: Setup Wizard - System Scan result
(click on the image for a full-sized view)
The Wizard is a self-contained .exe and doesn't need to be installed on the computer you run it on, although I found it was handy to copy the Setup.exe file from the CD to my hard drive during my experimentation. Figure 2 shows the result of the Wizard's hunt for WAP51ABs on my network. The wizard steps you through screens that allow you to:
- Manually set IP address, subnet and AP Name
- Set (E)SSID, and Channel for both 11a and 11b radios
- Enable WEP and set one key using either a passphrase to generate a Hexadecimal key, or entering it directly for the 11b radio, and Hexadecimal mode only for the 11a radio.
When you've completed all the steps, the info is saved and the 51AB automatically rebooted.
If you don't have a Windows machine, you'll need to use the Web browser interface. But you'll need to make sure the computer that you're running the browser on is in the 192.168.1.X subnet. This is because the AP comes set to 192.168.1.250 (subnet 255.255.255.0) as its factory default. (The IP address shown in Figure 2 was changed to match my test network.)
TIP: Try setting your computer to 192.168.1.254 (or any other 192.168.1.X address except 192.168.1.250 ), subnet 255.255.255.0, if you need to connect to a factory-fresh 51AB. You'll probably need to reboot, too, unless you're running WinXP.
NOTE! The 192.168.1.250 default IP address is not found anywhere in the printed "Quick Installation" brochure and you don't hit it until Page 11 of the PDF User manual, which is on a Windows formatted CD! Aren't you glad you're reading this review?
Once you get your computer and the AP in the same subnet, open your browser and enter the default IP address, enter the default password of admin, and you'll get the screen shown in Figure 3.
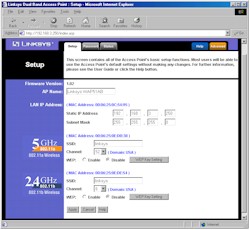
Figure 3: Wireless LAN Setup
(click on the image for a full-sized view)
A subtle point that I didn't notice for awhile is that you can only set the 51AB's IP address statically and can't have it grab it from a DHCP client. Not a big deal, since it's good practice to nail down wireless APs' IP addresses so that you always know where to reach them, but good to know.
As you can see from Figure 3, you get both the basic 11a and b radio settings on one page. Same goes for the "Advanced" settings shown in Figure 4.
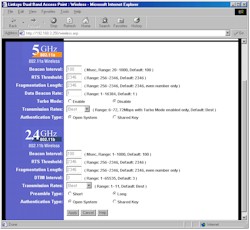
Figure 4: Advanced settings
(click on the image for a full-sized view)
By looking at the screenshots you can see what you have to fiddle with, so I won't repeat the info here. One missing control that I would like to see is the ability to disable each radio individually. Although it may seem silly to buy a dual-band AP, then shut off one of the radios, I can see uses for the feature. You also don't get the ability to set the transmit power on the 11a radio, which other 11a APs have.
The interface is nice and quick, although reboots are needed to get the changes you make on each page to take. But the reboots take about 10 seconds and automatically refresh the browser to signal you that they're completed. Multiple admin logins are allowed, with no warning given when two admins are logged in. Once you're logged in, there's no idle timeout, and you just need to remember to quit your browser when you're done, because there's no logout button.
Client monitoring is easy to describe - there isn't any. All the Status page shows you is the SSID, encryption mode, and channel of each radio, and IP info for the Ethernet interface. This means no network statistics either. So you'd better be able to see the lights on the 51AB's front panel, because you'll never know if it's working using the admin interface!