Setup
Although Linksys says that the WET is "completely driver-free, so it works on any platform and under any operating system", the WET11 experience is not plug-it-in-and-go. Once you get it out of the box, you'll find that both the Quick Installation and User Guides direct you to run the Setup Wizard on the supplied CD. For that, though, you'll need a system running Windows.
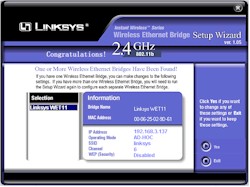
Figure 1: Setup Wizard - System Scan result
(click on the image for a full-sized view)
The Wizard is a self-contained .exe and doesn't need to be installed on the computer you run it on, although I found it was handy to copy the Setup.exe file from the CD to my hard drive during my experimentation. Figure 1 shows the result of the Wizard's hunt for WET11s on my network, but note that the settings are not the defaults. The wizard steps you through screens that allow you to:
- Select AdHoc or Infrastructure mode
- Set (E)SSID, Channel (AdHoc only), and Bridge Name
- Manually set IP address, subnet and Gateway, or get that info from a DHCP server
- Enable WEP and set one key using either a passphrase to generate a Hexadecimal key, or entering it directly.
When you've completed all the steps, the info is saved and you are prompted to power cycle the WET11 to reset it. This is fine if you're right next to it, but would be a pain if you were trying to reset a WET11 in a remote location, an attic for example. A Reboot button would have been much simpler, and I hope Linksys adds one to the Wizard.
If you're lucky enough to not have a Windows machine, you can still get the setup job done via the WET's Web browser interface. But you'll need to make sure the computer that you're running the browser on is in the 192.168.1.X subnet. This is because the WET comes set to 192.168.1.225 (subnet 255.255.255.0, gateway 192.168.1.1) as its factory default.
TIP: Try setting your computer to 192.168.1.254 (or any other 192.168.1.X address except 192.168.1.225 ), subnet 255.255.255.0, gateway 192.168.1.1 if you need to connect to a factory-fresh WET. You'll probably need to reboot, too, unless you're running WinXP.
Once you get your computer and the WET in the same subnet, open your browser and enter an address of 192.168.1.225, enter the default password of admin, and you should get the screen shown in Figure 2.

Figure 2: Web I/F - Info screen
(click on the image for a full-sized view)
This is a handy screen, but can be a bit misleading. The bottom Results of the most recent scan shows only WET11s, Access Points and wireless routers that are in range.. So you can't use this screen to monitor wireless clients that are either in-range, or associated with the wireless LAN that the WET11 is part of. There are no packet statistics or other ways to tell whether the WET11 is actually passing data, and don't look for logging, because there isn't any either.
The BSSID info can also be a little tricky to figure out. If the WET is set to Infrastructure mode to work with an Access Point or wireless router, the value will be the MAC address of the AP or router that the WET11 is connected to. If the WET11 isn't connected to any network, the SSID will read "non-spec" and the BSSID will show "44:44:44:44:44:44".
If the WET is set to AdHoc mode, however, I found you need to be careful in interpreting the information shown in the Info screen. Figure 3 shows a Netstumbler display for a scan that ran for about 10 minutes. Can you tell which is the real WET11?
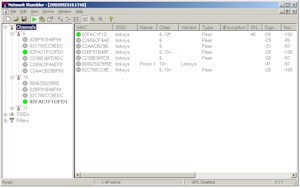
Figure 3: Netstumbler scan
(click on the image for a full-sized view)
Now I have to admit that I haven't previously played with AdHoc mode, so I had to do some checking to see if what I was seeing was normal behavior. After reading the SF Wireless Introduction to 802.11, my tentative conclusion is that the WET11 was probably behaving normally. But I sure found it a challenge to figure out what was going on! The lesson I learned here is to heed the warning that Linksys provides on the Info page and refresh the screen manually every time you look at it if you really need to rely on the information.
Figure 4 shows the Wireless settings screen. You get more settings here than in the Wizard, including Access Point Density, Deny Unencrypted Data, and Shared Key Authentication (not shown in the screen shot). All are reasonably explained in the on-line Help and User Guide (although I'm still trying to figure out "Deny Unencrypted Data"...).
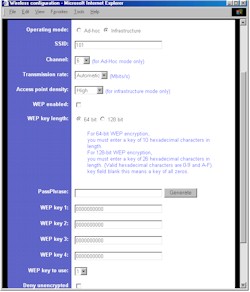
Figure 4: Web I/F - Wireless settings screen
(click on the image for a full-sized view)
Note that unlike in the Wizard, you do get Reboot (and Reset to Factory Defaults) buttons in the web interface (on the Admin screen). You also get access to the WEP keys, which are stored in clear text. Note, however, that using the Passphrase option generates the same code for all four keys, which may not be how Passphrase generation methods work on your wireless clients... if that option is offered at all! (And people wonder why users don't enable WEP!)
Security
As I mentioned above, you get WEP, Deny Unencrypted Data, and Shared Key Authentication as your major security features. But because the WET isn't an Access Point, it doesn't have MAC address Association control. It doesn't suppress broadcast of its ESSID either. So you may run a higher risk of having unwanted wireless "guests" if you are using a WET11 to add wireless capability to your network because of these limitations, and the fact that the WET does most of its neat tricks when operating in AdHoc mode, which in my opinion is a more "promiscuous" mode than Infrastructure.
If you're still with me, I'm finally ready to move on to Performance.