Setup
Setup for the WRT55AG is similar to that of Linksys' other current routers and very similar to that of its single-band WRT54G sibling [reviewed here]. So similar, that a lot of this review (until we get to the Performance section) is going to look like the WRT54G's! But I'll also point out differences between the two products as I go along.
You can run a Windows-only setup utility that walks you through choosing a WAN type and other setup steps, or go directly to the built-in web-based admin interface, which was my choice for setup.
Since the WRT55AG comes set to 192.168.1.1 as its factory default and built-in DHCP server enabled, all you'll need to do is plug in a client that's set to obtain its IP address information automatically, maybe do a DHCP release / renew (or reboot your client computer), and enter the default password into the login box that pops up. If all goes well, you'll get the main Setup screen shown in Figure 3.
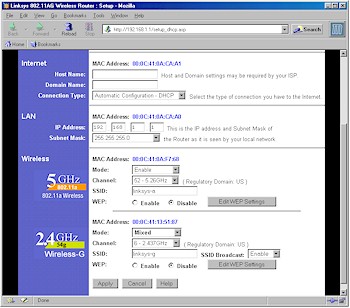
Figure 3: Setup screen
(click on the image for a full-sized view)
The interface follows Linksys' recent trend toward putting most of the stuff that you need to futz with for a basic setup on one screen, in this case the Internet (WAN), router LAN address (in case you need to get the router in tune with an existing LAN addressing scheme), and basic Wireless settings. I scrolled down to take the screenshot above, so you can't see the Timezone setting that's grouped with these other functions.
Also in keeping with trying to prevent user information overload, the Internet Configuration Type selector automatically refreshes the browser screen to present settings appropriate to the choices of Automatic Configuration - DHCP, Static IP, PPPoE, and PPTP Internet connection types. The one curious choice was not having the MAC address cloning feature needed for many broadband ISPs on this main Setup page. Instead, you'll need to click over to the System tab if cloning is what you need to do.
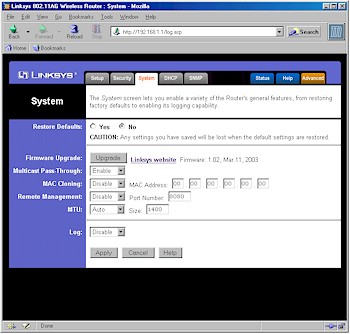
Figure 4: System screen
(click on the image for a full-sized view)
The Wireless settings on the Setup screen are just the basics, except for the (E)SSID Broadcast Enable/Disable, which prevents your 55AG from showing up automatically in wireless client applications (such as WinXP's "Available Wireless Networks") that show in-range AP's. Note that this is offered for the 11b/g radio only.
I was glad to see that Linksys included Disable as one of the Wireless Modes on both radios, since the ability to shut off the radio is a definite plus for security purposes. I'll describe what the Mixed and G-Only modes do in the Wireless performance section later.
NOTE: The WRT55AG does not offer Atheros' Turbo mode among the 11a radio's Mode selections - a curious omission considering the throughput boost that it can provide.
The interface is generally quick, but the mini-reboots needed to save the changes you make on each page take an annoying 30 seconds or so - much longer than on the WRT54G. Multiple admin logins are allowed, with no warning given when two or more admins log on. Once you're logged in, there's no idle timeout, and you just need to remember to quit your browser when you're done, because there's no logout button.
Linksys has taken a step back on the 55AG, since it doesn't implement the password-change nag feature found on the WRT54G when you enable Remote Management. You can still change the port used for remote management, though, which I'd advise doing since the default port of 8080 is included in just about every port scan that will frequently hit your WAN IP address.
Before I move on to describing the Firewall features, I must point out a very annoying bug that I hope Linksys fixes before you read this. The built-in DHCP server appears to stop working after about 5 minutes, requiring a reboot to get it going again. Very annoying, especially if you have a busy wireless LAN with clients associating and dis-associating frequently!