Setup
Buffalo ships an AirNavigator CD that contains a number of Windows-based applications, drivers for their client cards, and documentation for their products. Since the printed Quick Setup Guide poster included with the router suggested running the AirNavigator setup wizard, I dutifully did. Everything seemed to be going peachy until the process ended with a window from the AirNavigator that "Congratulations! Setup is complete", but an Internet Explorer window that was unsuccessfully trying to reach http://0.0.0.0/cgi-bin/index.cgi.
At that point, I put aside the Quick Setup Guide since my client machine that was Ethernet connected and running XP Home told me that my Ethernet connection was up and running. I just opened the Network Connection Status window, clicked on the Support tab and saw that I had leased a 192.168.11.X address. That meant that I should be able to connect to the router admin screen at 192.168.11.1.
But I also noticed that an Internet Connection Status icon had appeared in my System (Tray) Notification area, which told me that the G54 was UPnP-enabled. So I decided to how Buffalo had done with their UPnP implementation. I opened My Network Places, found an icon for Buffalo WBR Series, double clicked on it, entered the login info (conveniently found in the Quick Setup Guide) and was greeted with the Top level screen shown in Figure 1.
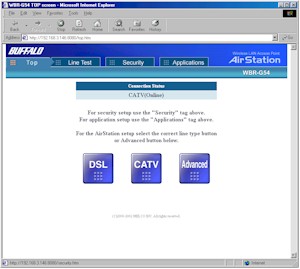
Figure 1: Top screen
Tip: As you can see, you don't really need to run a Windows machine to setup the AirStation, and I recommend you do your router setup from a wired client, not a wireless client as Buffalo suggests. Even if you are not running WinXP as your OS, just make sure your client machine is set to an IP address from 192.168.11.2 to 192.168.11.254, subnet mask 255.255.255.0 and point your web browser to 192.168.11.1.
NOTE: The G54 ships with a default username, but no password. Make sure you set a password, especially if you enable Remote Administration.
Since I started out via UPnP, I did a quick check to see if UPnP NAT Traversal was working by firing up Windows Messenger. I then opened the Internet Connection Properties, clicked on the Settings button and verified that Messenger had successfully opened ports as shown in Figure 2.
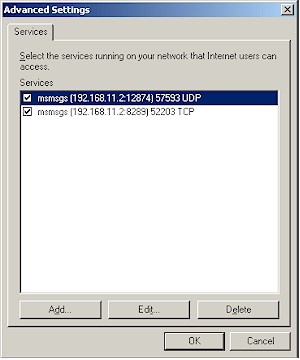
Figure 2: MS Messenger ports opened via UPnP
Going back to the screen in Figure 1, the "DSL" and "CATV" buttons launch auto-setup sequences that attempt to get the router WAN connection and local DHCP server set up and running. I didn't spend much time with them, since I don't have access to either type of connection. Instead, I clicked on the "Advanced" button and went right to the WAN Port screen shown in Figure 3.
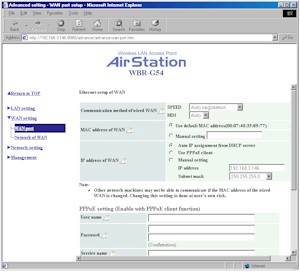
Figure 3: WAN Port settings
(click on the image for a full-sized view)
The G54 handles all the main WAN authentication types, although you have to go to the "Network of WAN" page to fill in Host Name or DNS server entries if your ISP's authentication scheme requires them. That screen also is where you can control whether the router will respond to WAN pings (disabled by default) and set a port number for remote administration. Note that as soon as you enter the port number, Remote administration is enabled, with no ability to limit access to a particular IP address or range of addresses. If you enable Remote Admin, make sure you set an administration password (found on the Management > Unit Information screen), since no password is set by default.
The G54 allows multiple administrator logins at a time and doesn't provide any warning when a second administrator logs in. There's also no way to log out of the admin interface, other than quitting your browser.
In general, I think that Buffalo has some work to do on the Admin Interface if they want to reach the mainstream consumer. A survey of the admin interfaces of the major consumer network product manufacturers should provide better screen organization models to emulate.
One plus that Buffalo has is their on-line Help. Virtually each setting has a little "help balloon" that you can click on and get reasonably useful information from. However, there is definitely a need to have a native English speaker review and re-write some of the screens, since I ran into at least a few instances where the wording was misleading or inaccurate.
My other major complaint is that you must endure a 10 second mini-reboot for changes in each section of each Admin page. This was very frustrating, not to mention time-consuming, when I was testing out the NAT Table (port forwarding) features of the firewall, which I'll cover next.
GroslZ I’m not easily impressed. . . but that’s impressing me! 🙂