Functional Overview
In a nutshell, Surveyor takes AirMagnet's WLAN scanning engine and marries it to an interactive display tool. The display tool is actually the back-end for a data-cruncher that takes the RF and location information gathered during a survey walk-around and transmogrifies them into visual maps of the WLAN signal profile in the survey area.
The signal profiles can be overlaid on a map of the physical layout of the survey area, or just displayed scaled to a length and width that you must enter. There's probably more than one way to do what Surveyor does, but AirMagnet has done it with their signature easy-to-use approach that will have you surveying and analyzing your first results within minutes of installing it. Figure 1 shows an example of Surveyor's handiwork, so that you can get an idea of what all this looks like.
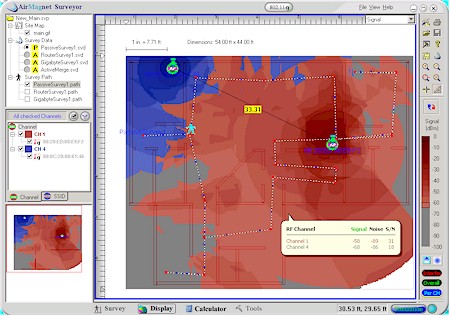
Figure 1: Surveyor Passive Survey result
(click on the image for a larger view)
Although this screen looks pretty daunting, it's easy to navigate once you get the lay of the land. I'll walk through the process of building this display step-by-step later.
Running Surveyor requires a computer running WinXP or 2000 and a supported wireless adapter. AirMagnet figured that most folks won't want to haul a desktop around to perform a survey, but will probably want a larger screen to look at all the pretty pictures that Surveyor can produce. So Surveyor's license lets you install one copy in a computer equipped with a MAC-address-locked WLAN card and one "display-only" copy in another machine.
AirMagnet continues to expand its list of supported cards which now includes adapters from 3Com, Cisco, Enterasys, IBM, NETGEAR, Nortel, Proxim and its own three CardBus adapters. AirMagnet shipped me its dual-band, tri-mode NL-5354CB, which is sourced from Senao and also available re-branded from EnGenius and other vendors. Note that none of Intel's Centrino, nor any other internal WLAN adapters are supported.
AirMagnet uses a licensing scheme that requires entering a serial number and serial "key" from the install CD and MAC address of the wireless adapter used. This info is sent via Internet to AirMagnet, which then issues a license file that's downloaded to your computer to activate the product. (There are also "alternate ways" to get a license file if you don't have an Internet connection handy.) The process worked without a problem for both my notebook and desktop installs.
Tip: The best way to experience Surveyor is to download a demo copy.
Walking in the prsenece of giants here. Cool thinking all around!